In this educational article we take a look at the bespoke printing process of Letterpress.
A brief history
 Letterpress is a form of relief printing dating back to the 1450s, when German-born Johann Gutenberg famously printed 180 copies of the Bible on his new invention. The moveable type ‘letter-press’. This invention directly led to the spread of mass produced books, eventually leading to universal literacy and profound social change. Undoubtedly, one of the greatest inventions in history. For over five hundred years, letterpress was the dominant form of mass printing, until superseded in the 1950s by offset lithography.
Galley of letters
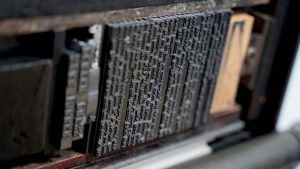
In the pre-20th Century, letterpress employed individual letters carved from wood and set within a frame (a Galley). Images used carved relief woodblocks. A loaded Galley, secured onto the press, was inked with a roller and ‘pressed’ onto the paper (hence: letter-press). Upon completion of a job, the Galley would be broken apart and the letter forms cleaned for reuse. During the Industrial Revolution (circa. mid- 1800s), letterpress became mechanised. Cast metal replaced wood for creating letter forms. Individual letters were cast in lead, called ‘hot type’. And images engraved into metal plates, became the new norm as letterpress flourished.
Lines of Type
 The next significant innovation occurred in 1886 when individual letter forms began to be superseded by cast sentences. These ‘lines of type’ became known as linotype. Working with linotype was particularly useful for quick turnaround printing, such as newspapers. The used metal blocks could be re-smelted and recast for the next issue. In the 1980s, another new innovation arrived as photo-polymer plates. Photo-polymer plates were produced straight-off digital artwork, and quickly began replacing linotype. Photo-polymer plates are significantly quicker to make and more cost-effective. Plus, they allow for a broader scope in terms of overall design. However, some letterpress printeries still offer the use of hot type or linotype.
The Legacy of Letterpress
From the mid-1900s, letterpress became increasingly less commercially viable as the much faster, more capable process of offset lithography took over. Most letterpress presses were resigned to scrap, or the museum—with active printing kept alive only by the efforts of a handful of loyal enthusiasts. The legacy of letterpress, however, endures through the use of terms such as; ‘upper case’ and ‘lower case’. These originate from the storage of these characters. Letter forms were stored in boxes called ‘cases’. The more frequently used lower case letters stored on ‘lower’ shelves, for easy access. And the lesser used upper case letters stored on the ‘upper’ shelves. Another term from letterpress still used today is ‘leading’. This originates from the strips of metal (lead) that were inserted between the lines of moveable type to create line spacing. Hence, even today—’leading’ is the correct typographic term defining line spacing.
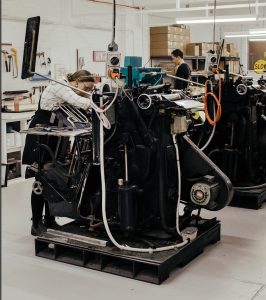 Letterpresses are no longer produced and most of the machines in use today are likely to date back to the mid-1900s or earlier. Some presses still in use are well over 100 years old. These presses are kept running with replacement parts sourced via a network of niche producers.
Letterpress today
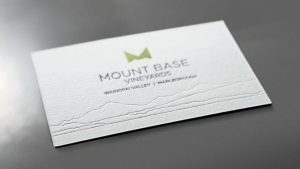
These days, 99.9% of all printed material on paper is produced using offset lithography or toner-based digital printing (laser printing). Letterpress has made somewhat of a comeback as a bespoke form of short-run printing—thanks to the tactile, crafted look created through this unique process. It completely contrasts the polished aesthetic of modern printing. Indeed, the constraints of this print medium, such as working in a single, two or three ‘spot’ colour spectrum—are the appeal and charm of letterpress. Nothing else looks like it. Today, despite a long and proud history of large-volume printing, letterpress is mainly used to produce short-run works. For example, invitations, business cards, stationery, certificates and limited-run art prints on high-quality papers.
The letterpress printing process


 Here’s how the letterpress printing process works:
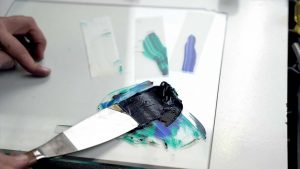
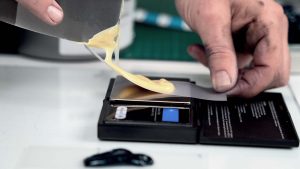
- Letterpress is predominantly Pantone-based. The Pantone PMS system uses a series of base inks which are mixed by hand to create all colours within the range.
- Pantone inks are mixed according to the formula prescribed in the Pantone Formula Guide swatchbook.
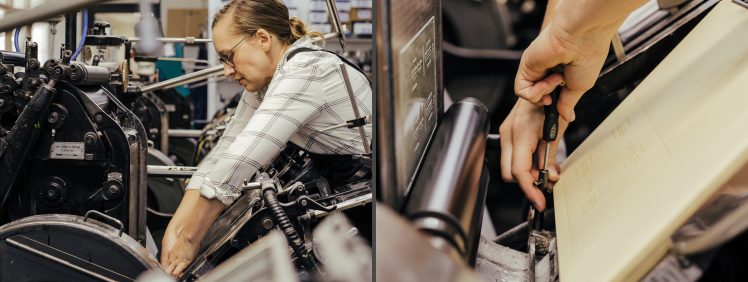
- A Spectrophotometer reads the colour density, ensuring the mix is accurate.
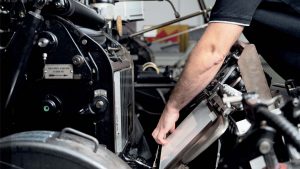
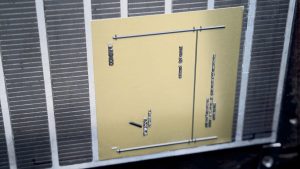
- The printer fits a photo-polymer plate to the press.
- The photo-polymer plate loaded on the letterpress is ready to go.
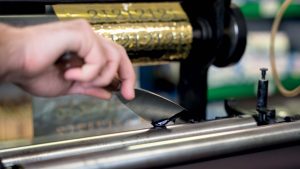
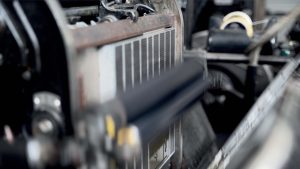
- Ink is added to the press by hand. This press also has foiling capabilities, as is evident by the roll of metal foil in the background.
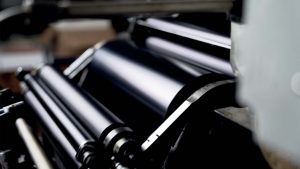
- The ink runs through a series of rollers to even the spread.
- With the letterpress running, the final ink roller passes over the printing plate, leaving ink on the raised relief.
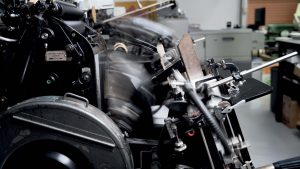
- The paper is stamped onto the plate—leaving a depression in the stock.
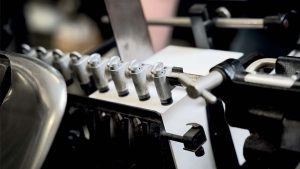
- A series of suction cups scoop the paper stock and feeds this into the press.
- The paper is stamped onto the plate. The resulting printed sheets are left to dry before being trimmed down to the finished size using a guillotine.
- This example is a business card. You can see the debossed impression left in the stock by the stamping process.
DESIGNING FOR LETTERPRESS
Letterpress is best suited to designs that use type and lineart generated in vectorbased apps such as Adobe Illustrator or InDesign. Using letterpress to print rasterbased images (i.e. photos) is possible but uncommon due to the inherent constraints of the process. Printing photos requires the image to be translated into a halftone plate (a halftone screen is a series of tiny dots of varying sizes that create the illusion of continuous tone). Importantly, these halftone screens are significantly coarser than the equivalent screens generated to make offset printing plates. Be aware that not all images suit this conversion. If you are thinking of printing photographic material using letterpress—seek guidance from your printer to ensure you understand what is required. Where letterpress gets somewhat tricky—is designing using spots only.
Pantone Spot Colours
Letterpress uses the Pantone Matching System (often called Pantone, PMS or spot colour) to print ink colours. It is possible to use CMYK process colour on a letterpress, but this is uncommon (as offset lithography and digital printing are better suited to this). Designing using Pantone colours is very different to CMYK process colours. CMYK relies on printing the four process colours (Cyan, Magenta, Yellow and Key-Black) over each other to create a broad colour spectrum. Whereas, Pantones are pre-mixed to their ‘true’ colour before going on the press using a mixing formula from a Pantone Formula Guide swatchbook (see side-story).
Spot Colour
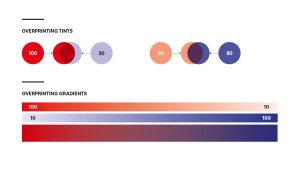
In Spot Colour work, the printable spectrum is restricted to the individual Pantones within the design. No other colours can be used. For example, if you are working using a single Pantone colour design, everything in the design must be a solid or tint of that colour. If you use two or three Pantone colours, in addition to solids or tints of each Pantone colour, you can also print one over another to create a third colour. For example, solid PMS485 (warm red) printed over solid PMS072 (a rich blue) creates deep purple. Solid PMS485 printed over a tint of PMS072 creates violet.
Overprinting
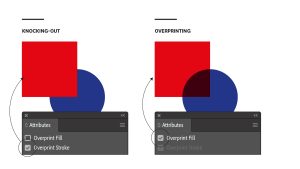
This is called overprinting. Overprinting can increase the number of achievable colours when working with more than one Pantone colour. However, when using more than one Pantone colour—it is essential to understand that, within apps such as Adobe Illustrator and InDesign, overprinting is not the default for resolving the relationship between multiple spot colours. And must, therefore, be set manually to occur. Within both Adobe Illustrator and InDesign, the default is to give precedence to the topmost object. This results in the top object knocking-out from anything beneath it.
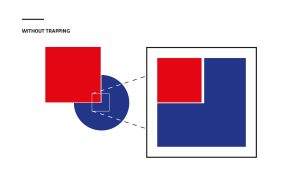
Knocking-out
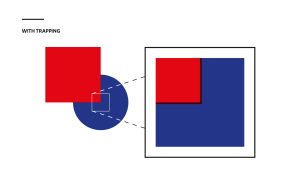
Knocking-out, however, creates one potential problem. Where any two objects overlap or meet, and a knock-out occurs, there is the potential that any slight misregistration during the printing process will result in an unsightly hairline split showing between the two elements. This is because they do not butt up exactly. Adding trapping will overcome this problem. Trapping is a fine stroke added manually to the top object in a multi-object relationship—with the stroke set to overprint. Adding this stroke increases the topmost object’s width slightly, which, combined with the overprint, compensates for any potential misregistration. Note that overprinting, knocking-out and trapping do not apply to single Pantone colour work (as there is no second colour against which to overprint or knock-out).
Non-Printed Specials
Letterpress is fundamentally a type of stamp printing. Meaning—the paper is ‘struck’ against a plate. For this reason, letterpress can do embossing, debossing, foiling and die-cutting. It is common for letterpress projects to use printed Pantone spot colour combined with one or more of these specials. Let’s take a look…
Embossing and debossing
Embossing and debossing are the same process; two metal die-blocks—a raised and a recessed block are loaded opposing each other onto the letterpress. As sheets of paper or card feed through the press—one block hits against the other, sandwiching the stock and creating a three-dimensional impression.
Embossing leaves a raised impression on the paper (i.e., towards the reader), and debossing creates a recessed impression. Typically, the height or depth of the stamped impression is between 0.15—0.5 of a millimetre (15—50uM).
When embossing does not register to a printed element on the page—it is called ‘Blind’ Embossing/Debossing. The desired effect is a raised or recessed area that does not directly correspond with printed content.
When this process specifically lines up the impression with a printed element, this is called ‘Registered’ Embossing/Debossing. An example is a printed word or graphic embossed/debossed from the surrounding content. Embossing/debossing can also be combined with Hot Stamp Foiling, done simultaneously as a single process using the same blocks—this is called ‘Combination’ Foiling (see below).
Foiling
Foiling is the process of adhering a micro-thin metal ‘foil’ onto a sheet of paper or board. This creates a very different aesthetic from metallic Pantone ink—with a more ‘true’ metal look. Foiling on a letterpress uses a process called Hot Stamp Foiling—similar to embossing/debossing but without a recessed block. The raised block is heated and hits the foil onto the paper. The combination of heat and impact pressure fuse the foil to the surface. Note that this stamping impact leaves a very slight deboss effect.
Combination Foiling
Combination Foiling is Hot Stamp Foiling with a recessed block added, resulting in foiling and embossing achieved in the same impression. It is important to note that combination foiling results in everything embossed being foiled, meaning you can not have foil or embossed in separate places on the design (this would require two separate processes).
Diecutting
Die-cutting (also called ‘knifing’) is a non-print-based process of stamping a form or shape from paper or board. A ‘die’ or knife block (made by hand by a specialist die-maker) is mounted onto the press, which stamps the printed sheets, cutting the form.
From an artwork perspective, these non-print specials should be set up as vector contours within the artwork. Then assigned as a spot colour in the same manner as a Pantone (the only difference is these do not print). This allows a separation to be generated out of the artwork for a die-maker to make the required block/s or die.
Also note that within your artwork—all instances of a non-printing special should be set to overprint—you do not want a die-cut or debossing shape to knock-out from your artwork. When it comes to fine detail in your artwork; as a general rule—the minimum line-weight is 0.25pt thick.
Paper stock for letterpress
Lastly, only certain papers or boards are suitable for letterpress. The ‘stamped’ nature of the process typically suits softer, uncoated and specialty papers and boards where the plate or block can bite into the stock. Coated papers and boards, which have a thin coating applied to create a smoother, more robust surface—are less suited to letterpress and should generally be avoided (test before committing to the print run).
SUMMARY
Hopefully, this article has provided some insight into the idiosyncrasies of letterpress. As always, if you are new to this process, we recommend discussing your ideas with your printer during the concept stage so they can provide technical guidance to ensure the best possible outcome. Use their experience to your advantage.
CREATING AND ADDING SPOT COLOURS
To create a spot within Adobe InDesign or Illustrator— follow these steps:
- Open the Swatches palette and create a new Swatch.
- Double-click the new swatch to activate the Swatch Options dialogue box.
- Change the Colour Type from Process > to > Spot in the Swatch Options.
- You will need to name the Spot colour: a) If this is a Pantone PMS spot colour, name this with the correct colour code—for example; Pantone PMS485 U. b) If this is a non-printed special such as embossing/debossing or foiling, the swatch name can be the name of the special (e.g., emboss).
- OK this and start using your new spot in your artwork
KNOCKING-OUT, OVERPRINTING AND TRAPPING
 Our examples left use two Pantone colours as per the above swatches palette (Illustrator).
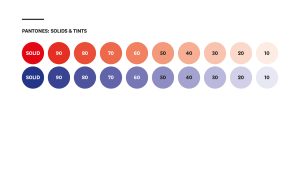
- These Pantones can be printed as either solids (100% ink coverage)—or as halftone tints (created using the slider in the Color Palette), anything from 99% down to about 5%. Below 5% is usually too fine to hold the ink during printing.
- Where two or more objects butt up or overlap; the objects can either knock-out (the topmost object takes precedence), or overprint (the topmost object prints over the object below).
- When using two or more Pantones; Overprinting solids, tints and gradients creates additional colours.
- Where knocking-out occurs, trapping should be set to compensate for any slight misregistration on the press.
SETTING OVERPRINTING MANUALLY
 When setting overprinting to a spot colour element in InDesign or Illustrator, it is important to understand that an overprint is always applied to the topmost object in a relationship of overlapping or stacked objects. Objects below—cannot overprint objects above them. To add an overprint, select the topmost element and, using the Attributes palette, select the Overprint Fill tick-box. You can check the overprint is working as expected by using the (handy) Overprint Preview function—(in both apps); go to View > Overprint Preview. If set up correctly, a third colour (the result of the overprint) will show in this preview function.
SETTING TRAPPING
 In Adobe InDesign or Illustrator, trapping is added manually by applying a stroke to the top object, using the same colour as the fill, and setting this to overprint—go to Attributes palette > Overprint Stoke. A stroke of 1-2pt is sufficient for trapping in letterpress
DESIGNING IN SINGLE COLOUR
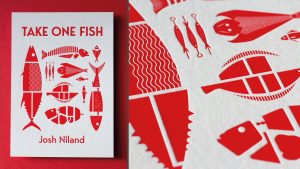 Working in a single colour may sound somewhat restrictive—but clever use of the colour can yield great results as this example demonstrates. This project is printed using a Pantone red. The corresponding swatches palette from Adobe Illustrator shows the spot colour swatch within the artwork. Working in a single Pantone PMS colour in this manner is generally straightforward; everything in your document should be either a solid or a tint of the spot colour being used—i.e., do not use any other colours.
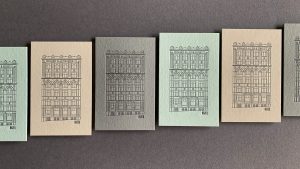
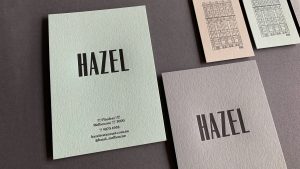 This series of business cards uses straight black printed on a series of different colours of the same stock. This project was produced in one print pass with the paper stocks changed out intermittently.
MULTI-PANTONE DESIGNS
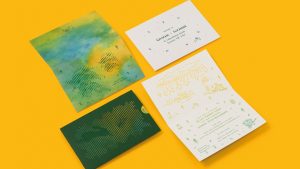 This invite project combines a number of different processes to create this look. The slip sleeve uses a green stock which has been die-cut—there are no printed graphics, and the outside of the invite has been digitally printed (CMYK). The inside of the invite (bottom image) has been letterpress printed using two Pantone inks; yellow plus a green. Both ink colours have been loaded into the ink well on the press, and as they mix together in the press, they create an analog gradient transitioning from green to yellow, called a ‘split fountain’.
PANTONE SWATCHBOOKS FOR LETTERPRESS
The Pantone Matching System (PMS) is based on a series of swatchbooks. These are used by designers to specify colours, and by printers to mix inks to match those colours. Most Pantone Swatchbooks come in a Coated (C) and Uncoated (U) version. The difference is the paper on which the swatchbook has been printed (Coated vs Uncoated paper). Note that the colours are the same in both versions. The reason for the two versions is because the different paper stock affects how the colours appear. Colours printed on uncoated paper are generally a bit more muted. As uncoated stocks are more common in letterpress, using an uncoated (U) swatchbook to specify colour is preferable to using a coated (C) version.
PMS Codes
In the Pantone Matching System, each colour is identified by a unique PMS code, which, in most instances, is expressed as the acronym PMS followed by either three or four digits to identify the individual colour, plus a C or U suffix—indicating whether the colour has been specified from a Coated or Uncoated swatchbook. An example is PMS485 U. Pantone colours are mixed ‘off-press’ from a series of base inks in a process not dissimilar to mixing house paint; the mixed ink is then added to the printing press.
There is a suite of different Pantone Swatchbooks (for different uses). The most applicable for specifying colour for letterpress is the Uncoated Colour Bridge or Uncoated Formula Guide (both versions contain the same colour range). In addition, there is also a Pastels & Neons Guide swatchbook which contains neon colours on Uncoated stock that can be used in letterpress. There is also a Metallics swatchbook. However, working with letterpress, it is more common to use foiling to achieve a metallic finish than to print this using ink which creates a different look.
GSM would like to thank Jenna Hipgrave @Hungry Workshop for supplying the example projects shown in this article and for her expertise in compiling the content, and also Tim Morris @ Laserfoil Design & Print for allowing us to photograph their letterpress in action. Some of the content in this article has been edited from previously published articles in GSM17 (p.20-21) + GSM CMYK (p.20-24).
For more information on letterpress with:
Hungry Workshop (Melbourne)—go to: //hungryworkshop.com.au
Laserfoil (Auckland) -go to: //laserfoil.co.nz
This article was originally published in GSM24. To read this and other great articles purchase this issue here.